Adding LaunchDarkly to your Angular CLI Application

Creating an angular app from scratch is annoying and time consuming. The easiest option is to use the Angular CLI to create a new app and its components; this gets you up and running very quickly. What I am talking about below is how to add the LaunchDarkly JavaScript library to an Angular CLI application, which uses Webpack to bundle your good work and throws a bit of a spanner in the referencing of files.
The basics
If you are looking to add LaunchDarkly to a pre-existing Angular app, great! If that app was not created using the CLI, there may be a few bits you may not need. To get up and running from scratch, open up a node command prompt and run the following commands…
Install the CLI from NPM
npm install -g @angular/cli
Create the new app
ng new featureflagging
This creates a new folder in your current working directory called featureflagging, and drops all the scaffolding in there. It does throw in a bunch of packages we don’t need for the purposes of this example, but we are just going to ignore them.
Run a bunch of commands
Now to fill up the app with the necessary packages First, the LaunchDarkly JavaScript client
npm install --save ldclient-js
This gets us the libraries, but it’s no fun just using the libraries and not having any type-ahead; let’s sort that one out, the below gives you the LaunchDarkly TypeScript definition file.
npm install @types/ldclient-js --save
Create a LaunchDarkly Service
ng generate service LaunchDarkly --flat false

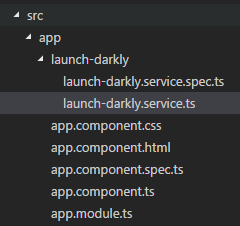
This will do everything it needs to throw down a new service called LaunchDarklyService in your app, the --flat false bit at the end there tells the CLI to put it in a folder. I like structure but you can have a big pool of files if that’s the way you like it.

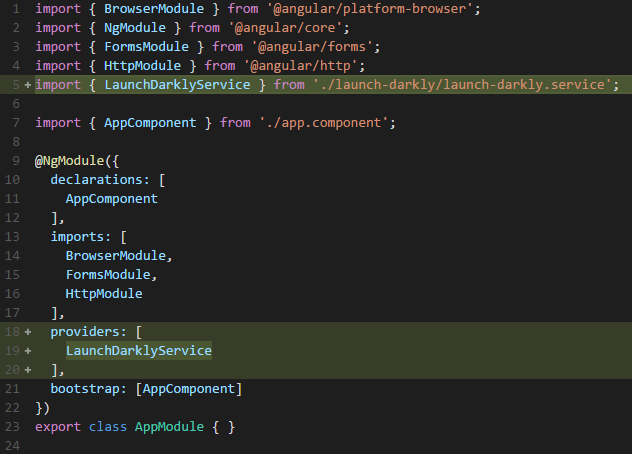
You may have noticed the warning about the service being generated but not provided. What this is saying is a reference to your new service needs to be added to the module file for the app.

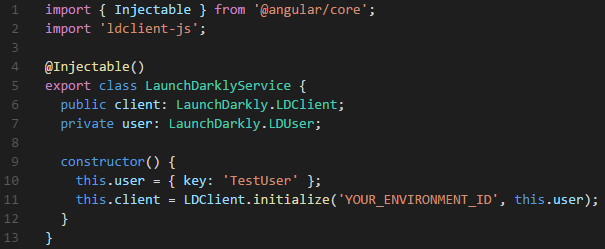
Now that the service is in place it needs a tweak or two.

As the LaunchDarkly package does not output a Typescript module, you need to reference the JavaScript file as-is and not specifying particular elements; this is what you see on line 2. Now if you were to view the app in a browser now, you would come across this nice little error, even though Webpack compiles successfully.

Why is this? Well that’s because Webpack doesn’t compile the LaunchDarkly JavaScript at all, you have to explicitly state you want to use it even when it is referenced in your packages.json file. Do this by referencing the npm package in the .angular-cli.json file

Use the service through your App
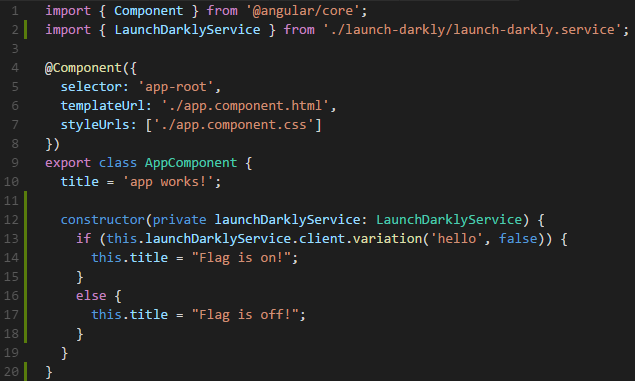
By this point, you are all set! It’s pretty simple checking against your feature flags. For me to test, I simply changed the app component to inject the LaunchDarkly Service (lines 2 and 12 below), then changed the title text in my app to indicate the status of my feature flag (lines 13 onward).

That’s it! You’re done! Obviously there is more I could mention about the types of flags and things like events, but I only wanted to cover how to implement it into an Angular CLI application; specifically due to the issue I had around Webpack and the 22 years it took me to figure out why my app had no idea about the LaunchDarkly JavaScript.